Features
Agronomy
Other Crops
Scouting your fields – what you should know
Field scouting is an essential part of integrated pest management, used to examine all aspects of crop production to achieve optimum yield. Scouting is the process of monitoring crop development in each of your fields to evaluate crop concerns and economic risks from potential pests and diseases.
April 26, 2017 By Ross H. McKenzie PhD P. Ag.
Ideally, farmers should scout their own fields to know first-hand how their crops are performing. For various reasons, many farmers are using commercial agronomy services for field scouting. A highly trained and skilled agronomist should have complete knowledge of crop biology, pest identification, life cycles of pests, pest habits, and know the correct crop sampling methods and economic thresholds for pests.
Whether you scout your fields or use the services of an agronomist, a detailed assessment of your crop conditions and pest populations is needed on a weekly basis during the growing season. Your goal is to have an accurate picture every week of potential crop and pest concerns in each of your fields. If you are using an agronomist for scouting, make sure their advice is completely unbiased. Accurate field scouting will ensure crop protection chemicals are only recommended when economically required and environmentally sound.
Preparing for scouting
For most annual crops in Western Canada, fields should be scouted weekly starting before seeding until after harvest. When the risk of insect or disease pressure is high during peak crop growth, monitoring every two or three days may be needed, especially if weather conditions are ideal for rapid development of specific pests or infestation levels are nearing the economic threshold.
When scouting fields, be prepared with the necessary tools, equipment and resource information including: clipboard with scouting sheets, tablet or smartphone with a scouting app; smartphone with a good quality camera; hand trowel or shovel; pocket knife; 10X magnifying lens; clear sample bags and vials for collecting plant or insect specimens; labels for samples; soil sample bags; hand counter for accurate plant, weed or insect counting; and flagging tape, pin flags or hand held GPS for marking field sites. In your vehicle, you should carry: reference materials to assist with identification of weeds, diseases and insects; a hand soil auger to check soil moisture and take soil samples; a one by one metre (m) square or 0.5 x 0.5 m square for plant counts and weed counts; a soil sieve; sweep net; shovel; and a cooler for specimen preservation. Some agronomists are now using unmanned aerial vehicles (UAVs) for some aspects of field scouting – a shift that could dramatically change crop scouting in the future.
If you have an agronomist scouting your fields, ensure they use proper sanitization for themselves, their equipment and their ATV or truck in order to prevent carrying any types of pests or diseases into your fields.
Scouting patterns
It is not possible to inspect an entire field, so randomly selected sample populations within a field should be observed to efficiently collect data and determine the distribution of any pests present. Sampling patterns must be completely randomized to ensure all areas within a field have an equal chance of being sampled. In fields of 80 to 160 acres, check at least five to seven locations. For larger fields, observe at least 10 to 15 sample locations.
There are various scouting patterns that can be used when scouting fields. Alberta Agriculture suggests using one or more of three different scouting patterns:
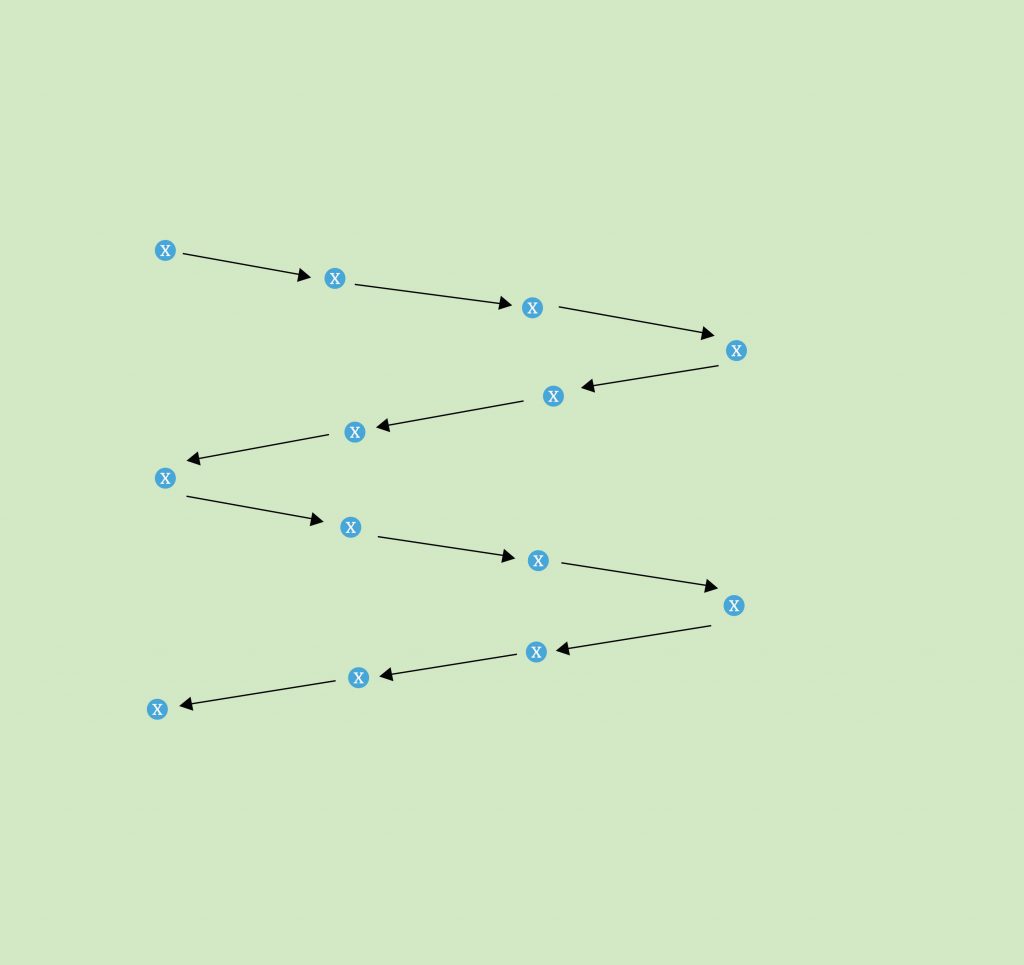
- Pattern I: When scouting for pests that are more or less uniformly distributed throughout the field, sampling sites should be evenly distributed across the field, excluding field edges, knolls or problem soil areas. Sample patterns typically look like a W or Z (see Figure 1).
- Pattern II: When pests are unevenly distributed, such as those associated with specific field areas like low, wet, dry, or unusual soil areas, the sampling should be concentrated in those areas.
- Pattern III: When pests are concentrated near field edges, sample by walking adjacent to field edges, fence lines or road ditches.
Depending on the issues of concern, different sampling patterns are used. For example, weeds like wild oats are usually throughout a field, while Canada thistle more often occurs in patches or near field edges. Herbicide-resistant weeds initially tend to be in patches. Some insects, like flea beetles or grasshoppers, are more prevalent along field edges, as they migrate from one field to another.
Previous field history
It is important to have a good history record for each field. This information is very useful for an agronomy field scout. But it is also helpful when a farmer has a complete record of field history. For each field, list: the legal land location; field name; history of previous crops; soil fertility problems or nutrient deficiencies; any soil problems; previous problems with insects such as wireworms or cut worms; past weed types and populations; herbicide-resistant weeds; previous disease problems; previous herbicides and herbicide groups used; and crop yields. For the current crop year, list the specific crop variety, seeding date, seeding rate, fertilizer used (including types, rates and placement) and tillage operations. Previous history can be very important when assessing crop problems.
Getting started
Field scouting starts before seeding, observing soil moisture conditions and the status of annual, biannual and perennial weed populations. Decide if, when and what herbicides to spray for weed control prior to seeding.
After seeding, scout for crop germination and emergence. Is crop emergence patchy – what conditions are causing patchy emergence conditions? Is seed bed moisture adequate for germination or is soil crusting affecting crop emergence?
During crop germination and emergence, watch for seedling diseases and insect feeding on roots or emerging leaves. After full crop emergence, conduct plant stand counts at a minimum number of observation sites – was the target plant population achieved? If not, what are the possible explanations? Learn as much as possible from your observations.
On each scouting date, record environmental conditions, crop growth stage, overall crop health and any visual crop concerns, weeds present before herbicide application, weeds controlled after herbicide application, weed patches not controlled, insect pests and number, beneficial insects, and diseases and disease pressure. This information will give a complete picture of developing problems. In fields with variable landscape, careful scouting is needed to observe the variation in crop growth, crop damage and pest distribution on knolls and upper, mid and lower slope positions.
Weed scouting
Scouting for weeds should start as soon as weeds appear in the field and continue until late fall. Scouting fields before seeding allows for planning weed control. After seeding, while assessing crop emergence, is the time to determine the infestation levels of the known weeds in your fields and to carefully determine if any new invading weeds are observed at very low levels. With good scouting information, you can select the best herbicides for effective control. If new weeds are detected very early, intensive control practices could allow for complete eradication.
When scouting for weeds, make sure you can recognize all the common types of weed seedlings and have resources to assist with identifying less common weeds. At each random observation site, record the number of each type of weed per square metre and the stages of growth of both broad-leaved and grassy weeds. Remember to be diligent after crop emergence to complete weed assessments and then apply the most appropriate herbicides. Research has clearly shown early weed control is often most economically beneficial.
Scout each field using a uniform sample pattern, but remember to sample in low or problem soil areas, which may have different weed types. Also observe field borders and adjacent road ditches to assess for encroaching weeds.
Continue scouting for weeds throughout the season. After spraying, watch for potential herbicide-resistant weeds and second flush weed patches. If observed, develop a management plan for future years.
Disease scouting
Crop disease issues can be caused by either biotic or abiotic factors. Biotic crop diseases are caused by pathogens, such as viruses, fungi and bacteria. Abiotic or environmentally-induced physiological conditions are caused by factors such as wind, frost, drought stress, excess moisture, nutrient deficiency, herbicide injury or problematic soil conditions. When scouting crops, it is critical to determine the cause of disease symptoms. The cause of symptoms is not always clear or easy to determine. Microscope and laboratory culture examinations may be required to confirm a diagnosis.
Scouting for diseases and insect damage can often be done at the same time and includes careful observation of roots, stems, leaves and seed pods/heads.
- Roots: When plants look unhealthy, be sure to examine the roots and the base of the stem for browning and for lesions. Wash roots with water to allow proper examination. Cut into roots to examine internal infection or browning.
- Stem sampling: Carefully examine stems for signs of diseased material or lesions. Split stems to examine for discolouration caused by pathogens.
- Leaf sampling: Examine all leaves on each plant for lesions. Estimate the amount of leaf surface area infection on lower and upper leaves. Leaf diseases tend to cause the most damage at the seedling and flowering stages of plant growth.
- Head/pod sampling: As heads or pods are developing, carefully examine for signs of pathogen material or lesions. The heads or pods should be split or taken apart and examined for discolouration caused by pathogens.
Use reference materials to assist with disease identification. If you are unsure of the crop disease, take pictures and email them to your provincial specialist for diagnosis. Plant samples may need to be sent to a provincial lab for culture and final diagnosis. For fungal disease, is pressure significant enough for fungicide application?
Insect scouting
Scouting for insects needs to start at the time of crop emergence. As mentioned, insects and diseases can often be assessed at the same time. Identifying all insects and population levels is useful to assess which ones may become a problem during the growing season. When the population level of an insect nears threshold level and damage is observed, a rapid decision is needed for control.
Insects vary in their level of mobility, therefore, different methods must be used for estimating population levels. Some insects can be estimated using a 38-centimetre (cm) diameter sweep net. Make sure you understand how to correctly use a sweep net. Some less-mobile insects (like armyworms) can simply be shaken from plants onto the ground and counted in a 50 cm by 50 cm area. Multiply the number by four to estimate pests per square metre. For grasshoppers that are quite mobile, hold a one-metre stick in front of you, walk in a line and estimate the number of grasshoppers that rise-up at five one-metre square areas along the 50-metre strip. Add the five counts together and divide by five for the estimate of grasshoppers per square metre. Getting exact counts is difficult, so the number is simply an estimate.
Also make sure you understand how to scout for and estimate populations of various insects you may encounter in your crops, then find out the threshold level when it is economical to spray for control. When you are unable to identify an insect, take pictures and forward them to your provincial specialist for assistance with identification.
- Root damage: Clean away soil from a plant’s roots and check for insects such as wireworms, cutworms and maggots. Look for feeding damage; if no insects are observed then sieve the soil adjacent to roots. If insects are very small, try spreading the soil very thinly onto a dark plastic garbage bag and carefully examine that soil.
- Foliage damage: Examine individual leaves and pay greater attention to the upper leaves, looking for the presence of insects and assess any visual damage. Examine the entire leaf and the sheath for the insect and scrapping or feeding damage. Handle and disturb the leaves as little as possible to prevent insects from falling off.
- Seed head and pod damage: Examine the surface of the seed head or pod for signs of feeding or puncture by insects. Open seed pods to examine inside of pods and check seeds to see if they are shriveled.
In summary, field scouting requires a very good knowledge of crop biology, weeds, insects and diseases. Your field scouting skills will improve as you gain more experience. Remember: for challenging diagnostic problems, be sure to seek assistance from your provincial department of agriculture specialists and local agronomists. Finally, the ultimate goal of field scouting is to help you with your crop management to achieve optimum economic yields.