Features
Agronomy
Fertility and Nutrients
Principles of allocating funds across nutrients
Farmers, advisers need basic principles of crop response. The situation: A farmer does not have enough money to purchase all of the supplemental nutrients needed by crops on the farm. He or she asks for guidance on how best to spend the money that is available.
November 14, 2008 By T. Scott Murrell and Tom W. Bruulsema*
Farmers, advisers need basic principles of crop response.
The situation: A farmer does not have enough money to purchase all of the supplemental nutrients needed by crops on the farm. He or she asks for guidance on how best to spend the money that is available. The challenge is to combine nutrients to reap the maximum possible benefit from their application, recognizing that when all needed nutrients cannot be purchased, overall production and profit will be compromised.
Allocating funds to one nutrient
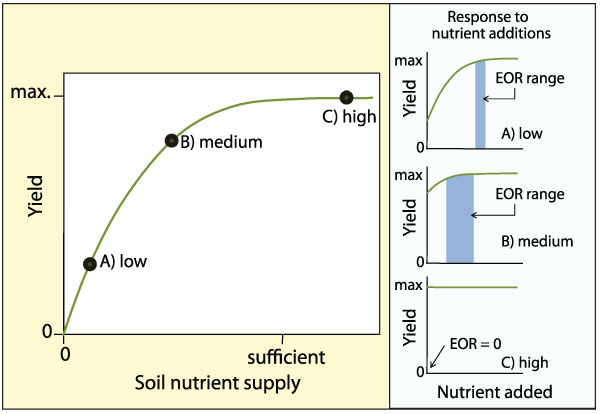
Let’s first consider the case where one nutrient is needed, but the total recommended quantity cannot be afforded. To reduce the total fertilizer bill, we need to allocate fertilizer to where it is needed most in the field. Areas of greatest need are those where crop responses are expected to be the largest. Figure 1 demonstrates the concept. In this figure, the large curve on the left is a conceptual model of crop response to soil nutrient supply. As the soil supply of a nutrient increases, crop yield increases until the soil becomes sufficient. Beyond this sufficient level, yield does not increase.

|
|
| Figure 1. A conceptual model of crop response to soil nutrient supply. Also shown are model crop responses to nutrient additions for A) low, B) medium, and C) high soil nutrient supplies. The shaded areas below the curves in A) and B) show the range in short-term economically optimum rates (EOR) based on various crop and nutrient prices. |
Next we examine how a crop is expected to respond to nutrient additions for each of the three soil nutrient supplies. These three expected responses are shown on the right side of the figure.
The top graph (A) shows that when a soil has a low supply of a nutrient, the yield attained with no additional supplement (where the curve intersects the vertical axis) is low (the same as point A on the larger graph to the left). However, adding more of the nutrient results in a large crop response. Because the response is so great, the short-term economically optimum rate (EOR) does not change much as prices vary, shown in the shaded area under the curve.
In the second case (B), where the nutrient level in the soil is at a medium level, the yield without a supplemental application is higher, reflecting the greater soil supply (the same as point B on the larger graph to the left). As a supplement of the nutrient is added, the crop still responds, but not as much as where soil supplies are lower. Most of the response occurs with the first few increments of nutrient added. The more subdued response leads to a greater sensitivity of the EOR to fluctuating prices (the shaded region under the curve). When the nutrient price is higher relative to the crop price, only lower rates are justified. However, when nutrient price is lower relative to the crop price, higher rates are needed.
The third and final graph (C) demonstrates that when the soil already has an adequate supply of the nutrient, further additions do not increase yield. In this case, the EOR is zero, regardless of economic conditions.
The concepts of crop response to a single nutrient result in the following guidance:
-
Allocate much of the nutrient to more responsive areas. More responsive areas are not very sensitive to price fluctuations. Examples of more responsive areas are:
P and K: areas with low soil test levels
N: areas that are coarser textured and/or have low organic matter contents
N: areas where corn has not been planted after a legume crop
Apply some of the nutrient to less responsive areas as well. Most of the crop response occurs with the first few units of added nutrient. Reductions are economically justified when nutrient prices are more expensive relative to crop prices. Examples of less responsive areas include:
P and K: areas with medium soil test levels
N: finer-textured soils and/or areas with higher organic matter contents
N: areas where corn is planted after a legume crop
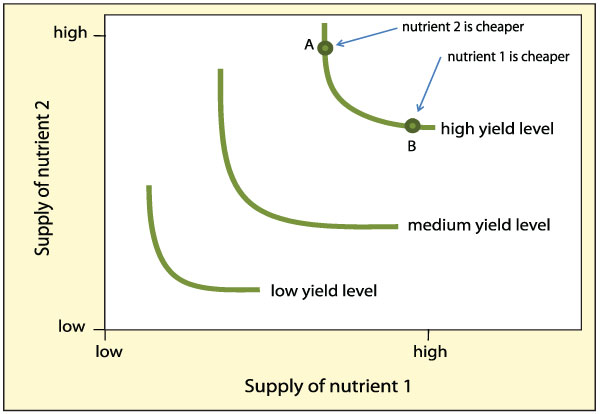
Allocating funds across two or more nutrients When more than one nutrient needs to be supplemented to a crop, the nutrients can interact to produce greater crop response than any particular nutrient applied alone. A conceptual example of how two nutrients interact is provided in Figure 2. The levels of each nutrient are represented by the two axes, with greater nutrient levels to either the right or toward the top. The curves shown on the graph represent single yield levels, labelled low, medium, or high. They are akin to contours on a map. Looking at one curve demonstrates that there are several combinations of Nutrient 1 and Nutrient 2 that can result in a single yield level. Although not shown because of complexity, the concept extends to
interactions of three or more nutrients.
Each curve has three parts: 1) the vertical part, which reflects the yield level attained from higher levels of Nutrient 2 but lower levels of Nutrient 1; the horizontal part, which shows the yield level possible with higher levels of Nutrient 1 but lower levels of Nutrient 2; and 3) the curved portion (the elbow) which represents the same yield level derived from more balanced levels of both nutrients.
Because there are several combinations of both nutrients that can produce the same yield, there is some flexibility in how we combine the nutrients to attain a given yield, based upon nutrient price. In the upper right of Figure 2, we see that both nutrients must be present at higher levels to attain high yield. However, there is flexibility in the latter units added. Point A is the case where adding a unit of Nutrient 2 is cheaper than adding a unit of Nutrient 1. In such a case, the desired high yield can by achieved if the last few units of added nutrients are allocated more toward Nutrient 2 than Nutrient 1. In other words, we add more of the less expensive nutrient. Conversely, if a unit of Nutrient 1 were cheaper (point B), then more of it should be added instead.

|
|
| Figure 2. A conceptual model of the interaction of two nutrients on crop yield. Each curve represents a single yield level, indicated as low, medium, or high (adapted from Figure 2-4 on p. 99 in Black, 1993). The axis shows how various combinations of each nutrient can produce the same yield (one curve) or different yields (moving from one curve to another). Points in upper right show that A) higher levels of Nutrient 2 compared to Nutrient 1 are justified when an increment of Nutrient 2 is cheaper, and B) higher levels of Nutrient 1 compared to Nutrient 2 are justified when an increment of Nutrient 1 is cheaper. |
Figure 2 also provides insight into how university recommendations may need to be adjusted when considering nutrient interactions. First, we need to recognize that university recommendations are generally based upon experiments that change the level of only one nutrient, while keeping the levels of all other nutrients non-limiting. For instance, if Nutrient 1 were the focus of such research, the resulting recommended supply would likely be that associated with point A, since the level of Nutrient 2 is non-limiting there. However, if a decision is made to reduce the level of Nutrient 2 because of economics, the recommended amount of Nutrient 1 becomes too low to attain high yield. So we see that it can actually take more than the recommended rate of a nutrient when other nutrients are limiting. This result demonstrates that while nutrients can interact in beneficial ways, they can also interact in detrimental ways when they become limiting.
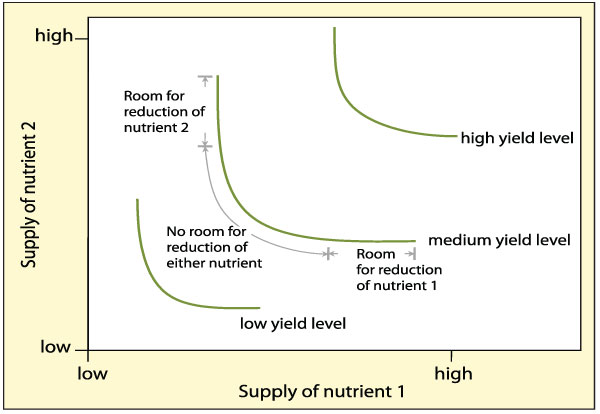
How much, if any, yield reduction occurs by reducing the supply of Nutrient 1 or Nutrient 2 depends upon where you start on a particular yield curve. If we reduce the supply of Nutrient 2 when it is high on the vertical part of the yield curve, no significant yield reduction will occur until we start to move toward the elbow. The same holds true for Nutrient 1 if we are far to the right on the horizontal part of the yield curve. The more horizontal or more vertical parts of a yield curve therefore convey some concept of risk management, as shown in Figure 3. At higher than needed levels, there is room for error in the management of either nutrient and for the uncertainty involved in predicting nutrient needs for any one growing season. However, when the levels of both are more balanced (the elbow region), reducing one or both nutrients necessarily results in lower yield.
 |
|
| Figure 3. The conceptual model described in Figure 2 with risk assessments imposed.
|
|
 |
|
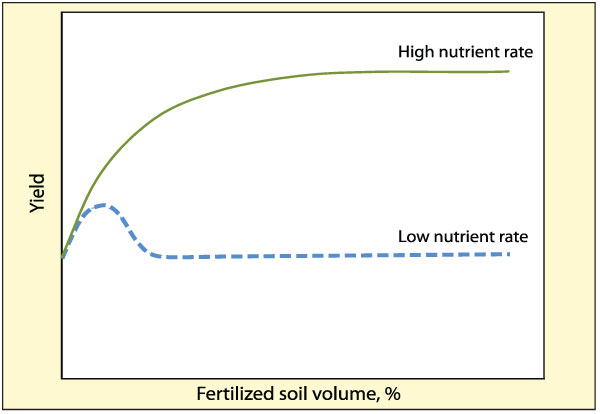
| Figure 4. A conceptual model of the interaction of nutrient rate with placement upon crop yield (adapted from Anghinoni and Barber, 1980). |
The concepts of nutrient interactions lead to the following guidance:
Examine rates of nutrients typically used. Cut back on any that are in excess of crop need;
When considering cutting back on the last few units of more than one nutrient, cut back on the nutrients that are more expensive per unit;- If you have to cut back on one or more needed nutrients that have higher per unit costs, add as much of the less expensive nutrients as you can. The required rate of
those less expensive nutrients may become higher than typically recommended if the reductions in other nutrients adversely affect yield;
Try to apply at least some of all nutrients that are in short supply in the soil to make use of the positive interactive effects.

|
|
| Direct seeding equipment provides fertilizer placement options to achieve good fertilizer use efficiency.
Photo courtesy of Bruce Barker.
|
P and K placement depends on rate
Although not a formal part of the theory of allocating funds across nutrients, the way in which nutrient rate and placement are interrelated is important to consider when reducing rates. The concept of how these two factors interact is shown in Figure 4. The two curves in this figure show how yield responds to the percent of the potential rooting volume fertilized with a nutrient. The assumption is that the soil itself does not contain a sufficient level of the nutrient, so a crop response is expected. The lower dotted line shows that response to a low rate of a nutrient is maximized when a relatively low volume of soil is fertilized. Conversely, when a higher rate is applied, crop response is maximized when a greater volume of soil is fertilized. The crop response to the lower rate confined to a smaller volume of soil is less than that associated with a higher rate distributed over a greater volume of soil.
The practical implications of this theory are as follows:
If only a low rate of a needed nutrient can be afforded, consider banding it and placing it strategically. Roots should be able to intercept it early in their development, but the nutrient should be placed far enough from the seed to minimize any possibilities of damage.
If a higher nutrient rate can be applied, consider banding part of it strategically and broadcasting and incorporating the rest to fertilize a greater soil volume.
| Dr. Scott Murrell (smurrell@ipni.net) is IPNI North-central Region Director, located at West Lafayette, Ind. Dr. Bruulsema is IPNI Northeast Region Director, located at Guelph, Ont. Reprinted from Better Crops with Plant Food, with permission of International Plant Nutrition Institute. |